SRAM GXP installation question

Back by popular demand, the general all-things Road forum!

Moderator: robbosmans

G1032
Posts: 32
Joined: Mon Jul 27, 2020 7:49 pm

by G1032

Hi folks
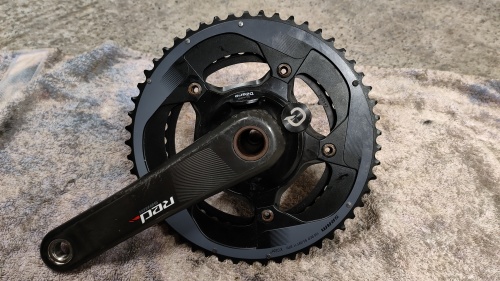
I have a SRAM GXP crankset (pictured below)
Image
Image

I bought this BB for it. A Katana GXP Ceramic BB
https://www.bike-discount.de/en/katana- ... om-bracket
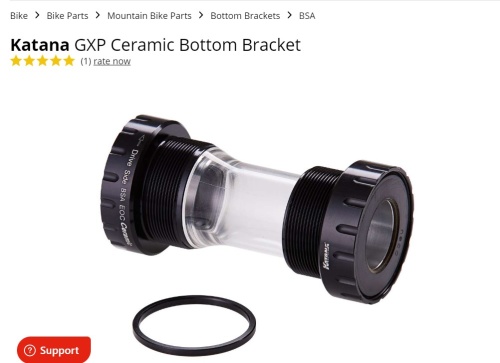
Image
Image

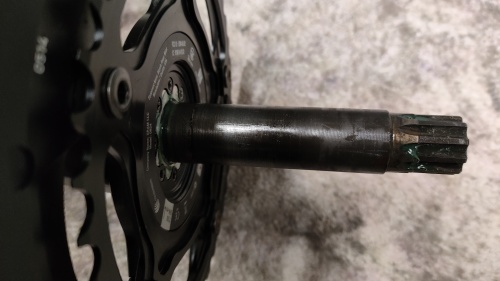
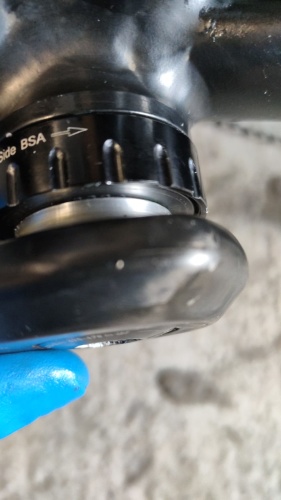
Problem is when I install the crankset - the NDS arm compresses in against the bearing cover and then the cranks don't really rotate. Much too much load on the bearings. See pic below
Image

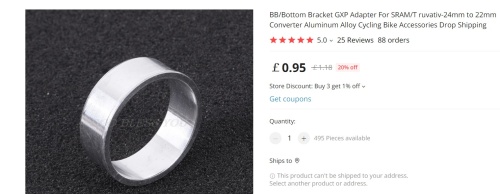
I came across these small little adapters that basically sit between the bearing and the spindle, buy surely fitting one of these will mean the spindle can't fit through? I think these are to convert Shimano BB to GXP????
Image

So what to I need to install these cranks correctly? Thanks

MichaelK
Posts: 461
Joined: Wed Jul 04, 2018 4:50 pm
Location: London, UK

by MichaelK

You are correct about the adapter. It steps up the 22mm spindle on GXP to 24mm to use in a Hollowgram BB.

You need to remove the non-drive BB and remove the spacer you've installed between the BB and frame. Then shim the crank arm to the required pre-load.

by Weenie


Visit starbike.com Online Retailer for HighEnd cycling components
Great Prices ✓    Broad Selection ✓    Worldwide Delivery ✓

www.starbike.com


eins4eins
Posts: 736
Joined: Wed Sep 28, 2016 11:49 am

by eins4eins

The bearing should be fine without an adapter. But you can easily measure that. Should be 22mm ID for the NDS bearing. Crank would be loose otherwise as well.

GXP means fixed bearing for NDS side, floating on the DS. That means the NDS Arm needs to compress against the bearing. If the crank doesn't spin, there are only two possible reasons: crank axle too short or bottom bracket to wide and DS arm is pulled against the bearing.

I see whats looks like a spacer between bottom bracket and frame on your picture. Are you sure this is needed?

G1032
Posts: 32
Joined: Mon Jul 27, 2020 7:49 pm

by G1032

Thank folks. Ya, I'm pretty sure I don't need that spacer. I will measure BB shell this evening. Think it's 68mm. I can't remember now but I'm almost positive I tried this without the spacer. In any case I will try again. Do I basically have to tighten the crank arm until it compresses just enough that I can rotate it freely or should it just hard stop itself? That 8mm nut is supposed to torque to something like 45nm?

User avatar
xsnailx
Posts: 314
Joined: Sat Mar 26, 2011 4:36 pm
Location: Poland
Contact:

by xsnailx

1. you may need a wave washer on the drive side between crank and a bottom bracket - like this - check the manual, because i dont have a gxp cranks for a long time :( (https://www.tradeinn.com/bikeinn/pl/sra ... lsrc=aw.ds

2. you need to remove the shim between frame and bottom bracket on the non drive side

3. check the internal diameter of the non drive side bearing if it is 22mm - if yes than you dont need the 22 to 24 adapter

G1032
Posts: 32
Joined: Mon Jul 27, 2020 7:49 pm

by G1032

Super. Thanks!

bobones
Posts: 1287
Joined: Mon Aug 12, 2013 11:19 am

by bobones

I've got a couple of GXP road bikes. As other say, you should fit both cups without any spacers. If there is any lateral play after tightening up the crank fully then you may need to fit a wave washer outside the DS cup to take up the play or shim with thin spacers to achieve the same effect. If you're lucky, you might find that the crank spins smoothly with no play without any washers or spacers. You don't need the 24 > 22 mm adapter with a GXP BB: those are for converting 24 mm cups such as Shimano HTII.
Last edited by bobones on Fri Mar 10, 2023 12:05 pm, edited 1 time in total.

maristegi
Posts: 7
Joined: Tue Sep 27, 2022 9:53 am

by maristegi

I think that you have a assembly problem. That bushing is necessary to decrease from diameter 24mm to 22mm on non Drive side.
BUT, that bushing must be installed from the inside of the non Drive bearing cup, I think that you may have assembled from the outside.

Enviado desde mi ASUS_I006D mediante Tapatalk


Attermann
Posts: 923
Joined: Sun Jan 05, 2014 11:04 pm
Location: Denmark

by Attermann

the wave washer on the NDS is only for pressfit cups, when they are threaded, it isn't needed.

G1032
Posts: 32
Joined: Mon Jul 27, 2020 7:49 pm

by G1032

Thanks all. Won't get a chance to go at this this evening so will try tomorrow

TobinHatesYou
Posts: 12550
Joined: Mon Jul 24, 2017 12:02 pm

by TobinHatesYou

Attermann wrote:
Wed Mar 08, 2023 5:42 pm
the wave washer on the NDS is only for pressfit cups, when they are threaded, it isn't needed.

The wave washer goes on the DS in the scenario above in order to make sure the bearings don’t walk themselves out over time.

If someone is putting a shim or wave washer on the NDS, they are doing it because the stepped portion of the spindle is too long and the bearing isn’t getting properly sandwiched between the step and the NDS crank. …or because they didn’t follow the instructions.

TobinHatesYou
Posts: 12550
Joined: Mon Jul 24, 2017 12:02 pm

by TobinHatesYou

maristegi wrote:
Wed Mar 08, 2023 4:53 pm
I think that you have a assembly problem. That bushing is necessary to decrease from diameter 24mm to 22mm on non Drive side.
BUT, that bushing must be installed from the inside of the non Drive bearing cup, I think that you may have assembled from the outside.

Enviado desde mi ASUS_I006D mediante Tapatalk

If I read his post correctly, this bushing is something he searched for independently and didn’t come with his already GXP-compatible BB. Either the BB kit doesn’t need it or already came with the bushing, so he wouldn’t need to buy one separately from that AliExpress listing.

It’s not installed in the photo anyway. The silver portion you are looking at is the exterior of the splined interface on the crankarm.

Attermann
Posts: 923
Joined: Sun Jan 05, 2014 11:04 pm
Location: Denmark

by Attermann

TobinHatesYou wrote:
Thu Mar 09, 2023 12:31 am
Attermann wrote:
Wed Mar 08, 2023 5:42 pm
the wave washer on the NDS is only for pressfit cups, when they are threaded, it isn't needed.

The wave washer goes on the DS in the scenario above in order to make sure the bearings don’t walk themselves out over time.

If someone is putting a shim or wave washer on the NDS, they are doing it because the stepped portion of the spindle is too long and the bearing isn’t getting properly sandwiched between the step and the NDS crank. …or because they didn’t follow the instructions.
That was a typo, I meant the DS.

G1032
Posts: 32
Joined: Mon Jul 27, 2020 7:49 pm

by G1032

I think i've found the issue and I think it's to do with the BB

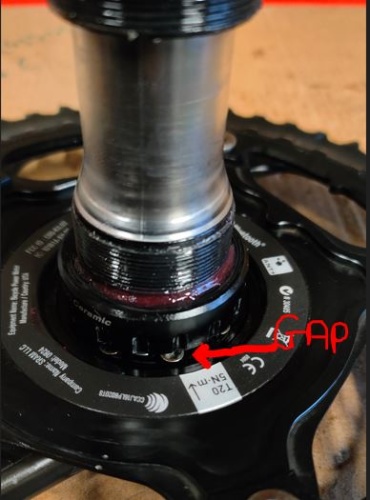
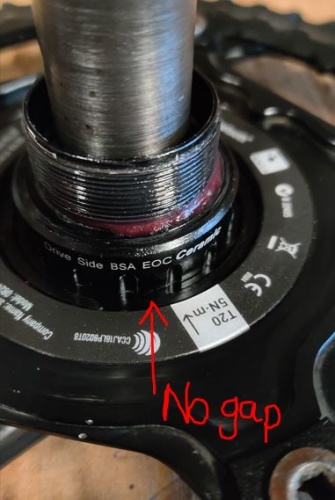
With the BB off the bike the drive side bearing will slide all the way down the spindle to contact the crankset but it doesn't meet the crankset when the BB is assembled. It's as if the NDS bearing won't go far enough down the spindle. See the gap between the DS bearing and the crank in the video and photos below. You can clearly see a huge gap between the bearing and the crank (video and photo 1) which is not there when just the drive side bearing in slid down the spindle (photo 2)
The shell width is 67.5mm give or take a few fractions of a millimeter.
When the spindle is all the way through as far as it will go I've got about 12.7mm out past the NDS bearing.
Overall length of spindle is 107mm

Photo 1
Image
Video
https://youtube.com/shorts/Y_IMqgcoMvc [cannot for the life of me get this to embed but clicking the link works]
Photo 2
Image

Before I go emailing looking for a replacement BB can someone please confirm that this is indeed the issue and that the spindle should be able to slide all the way through so that the DS bearing touches the crank.
Thanks

Attermann
Posts: 923
Joined: Sun Jan 05, 2014 11:04 pm
Location: Denmark

by Attermann

The gap is normal, the step down locks onto the NDS bearing, so it doesn't matter there is a gap.

by Weenie


Visit starbike.com Online Retailer for HighEnd cycling components
Great Prices ✓    Broad Selection ✓    Worldwide Delivery ✓

www.starbike.com


Post Reply