

Colnago C64 - Inside and Out
Moderators: MrCurrieinahurry, maxim809, Moderator Team
-
Johnny Rad
- Posts: 2026
- Joined: Fri Feb 17, 2006 6:22 am
- Location: Zion

Ok, I realized I forgot to mention something about the fork in my earlier post. I noticed a rendering of the inside of the fork steerer as published by Bike Radar I think... here it is... (also on Colnago's website)...
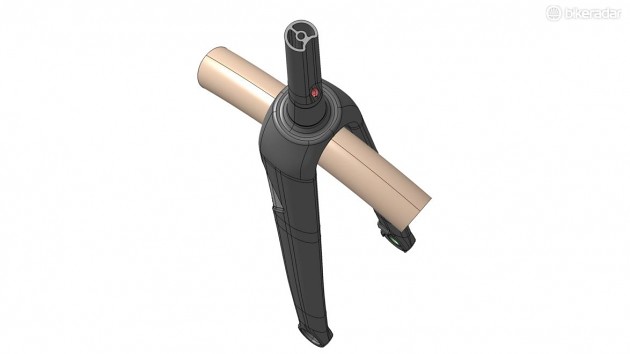
See the cross section of that steertube? Apparently it's structurally sound enough that it does away with the large compression plug that Colnago has supplied in the past and also provides an anchor for the preload bolt and top cap. I like that idea. Except, today I pulled the fork out just to check all this stuff and look at the cable routing that was asked about. To my surprise I just saw a normal hollow steertube, nothing out of the ordinary, and perfectly round with no "channel" molded in like that rendering shows. So I popped open the little box of goodies to see if they include a compression plug and sure enough... same one as the C60... I'm thinking that maybe the rim brake version doesn't have all that fancy channeling, or that that fork as shown in the rendering isn't quite in full production yet... I don't know...
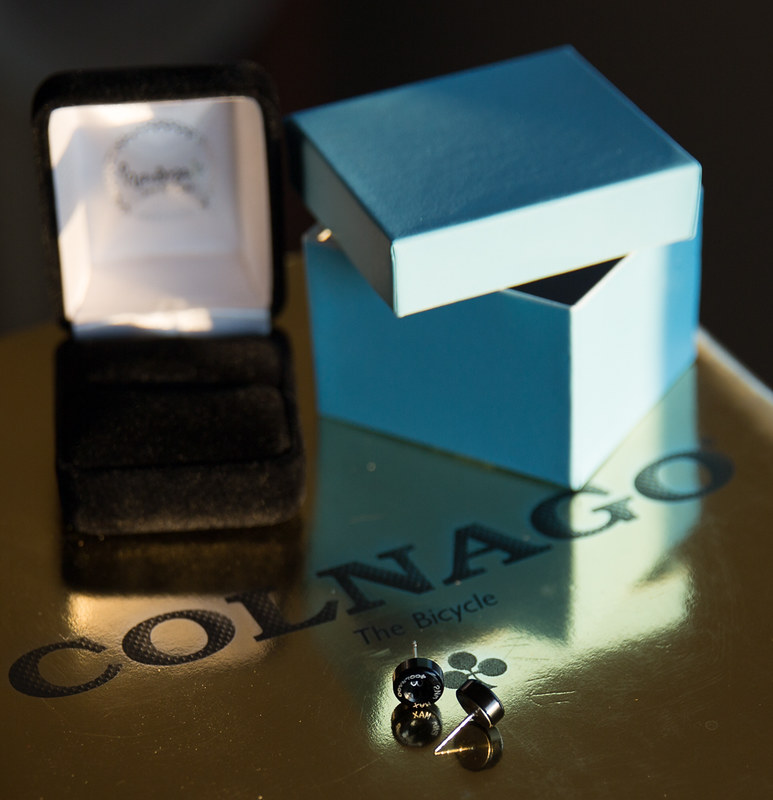
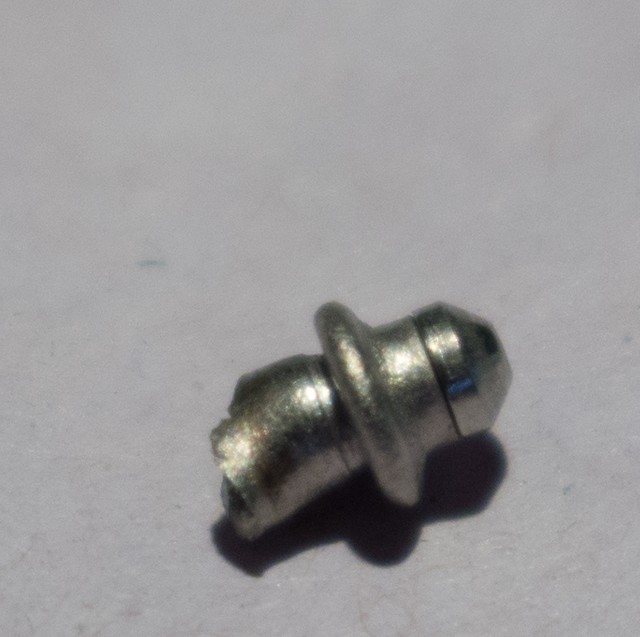
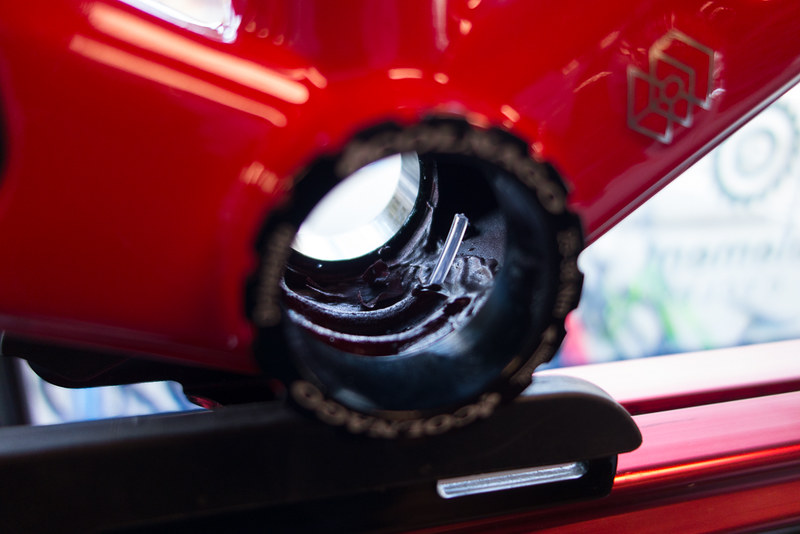
Hmmm... those little jewels of water bottle cage bolts would be a shame to waste in that cesspool of dried sportsdrink, when they could be put to much better use as earrings...
See the cross section of that steertube? Apparently it's structurally sound enough that it does away with the large compression plug that Colnago has supplied in the past and also provides an anchor for the preload bolt and top cap. I like that idea. Except, today I pulled the fork out just to check all this stuff and look at the cable routing that was asked about. To my surprise I just saw a normal hollow steertube, nothing out of the ordinary, and perfectly round with no "channel" molded in like that rendering shows. So I popped open the little box of goodies to see if they include a compression plug and sure enough... same one as the C60... I'm thinking that maybe the rim brake version doesn't have all that fancy channeling, or that that fork as shown in the rendering isn't quite in full production yet... I don't know...
Hmmm... those little jewels of water bottle cage bolts would be a shame to waste in that cesspool of dried sportsdrink, when they could be put to much better use as earrings...
Last edited by Calnago on Fri Mar 02, 2018 10:34 pm, edited 1 time in total.
Colnago C64 - The Naked Build; Colnago C60 - PR99; Trek Koppenberg - Where Emonda and Domane Meet;
Unlinked Builds (searchable): Colnago C59 - 5 Years Later; Trek Emonda SL Campagnolo SR; Special Colnago EPQ
Unlinked Builds (searchable): Colnago C59 - 5 Years Later; Trek Emonda SL Campagnolo SR; Special Colnago EPQ


Visit starbike.com Online Retailer for HighEnd cycling components
Great Prices ✓ Broad Selection ✓ Worldwide Delivery ✓
www.starbike.com
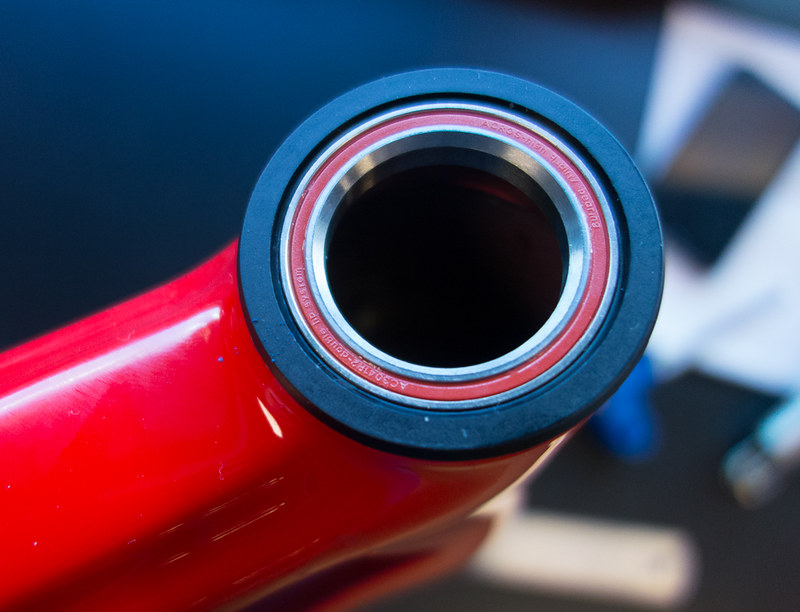
Ok... that's the front end for the most part... oh not quite... the bearings and headset, yes, a moment on them.
They are pretty much the same as the C60 except the top bearing is in some polymer cup instead of the alloy one it used to be in...
And the bottom... same as before...
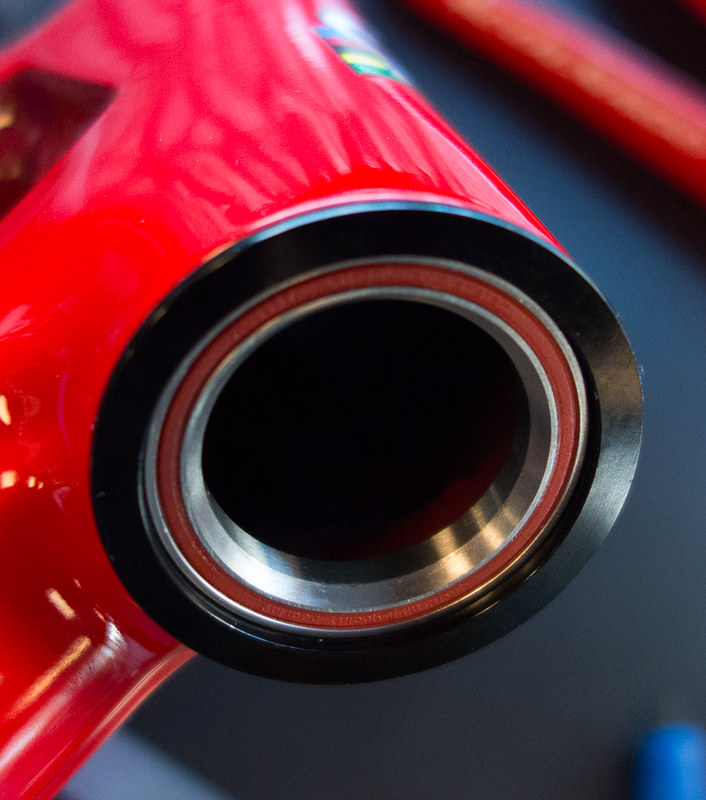
Colnago is saying that the polymer cup aids in vibration damping. Take that for what the paper it's written on is worth. Oh wait... I'm not using paper.
They are pretty much the same as the C60 except the top bearing is in some polymer cup instead of the alloy one it used to be in...
And the bottom... same as before...
Colnago is saying that the polymer cup aids in vibration damping. Take that for what the paper it's written on is worth. Oh wait... I'm not using paper.
Last edited by Calnago on Mon Feb 12, 2018 2:27 am, edited 2 times in total.
Colnago C64 - The Naked Build; Colnago C60 - PR99; Trek Koppenberg - Where Emonda and Domane Meet;
Unlinked Builds (searchable): Colnago C59 - 5 Years Later; Trek Emonda SL Campagnolo SR; Special Colnago EPQ
Unlinked Builds (searchable): Colnago C59 - 5 Years Later; Trek Emonda SL Campagnolo SR; Special Colnago EPQ

Well, this is the first year they've had this little logo for the sealed trap door of Quality Control. And although I haven't got to the bottom bracket discussion yet, I know they decreased the width of the downtube in that area by about 3mm for the C64 for, I think, exactly that reason. Not because it caused dropped chains (that's a setup issue usually, or freak occurrence), but rather because if that did happen things were a little tight and it could get caught in there I guess. I've never once dropped a chain on my C60. @Beeatnik... are you reading this? Anyway, you might want to check out this thread when you get a chance to see if maybe your adjustment might be off a bit, assuming your group is post 2015 vintage... good luck and hopefully no more chain drops in the future...
viewtopic.php?f=3&t=150067
Colnago C64 - The Naked Build; Colnago C60 - PR99; Trek Koppenberg - Where Emonda and Domane Meet;
Unlinked Builds (searchable): Colnago C59 - 5 Years Later; Trek Emonda SL Campagnolo SR; Special Colnago EPQ
Unlinked Builds (searchable): Colnago C59 - 5 Years Later; Trek Emonda SL Campagnolo SR; Special Colnago EPQ
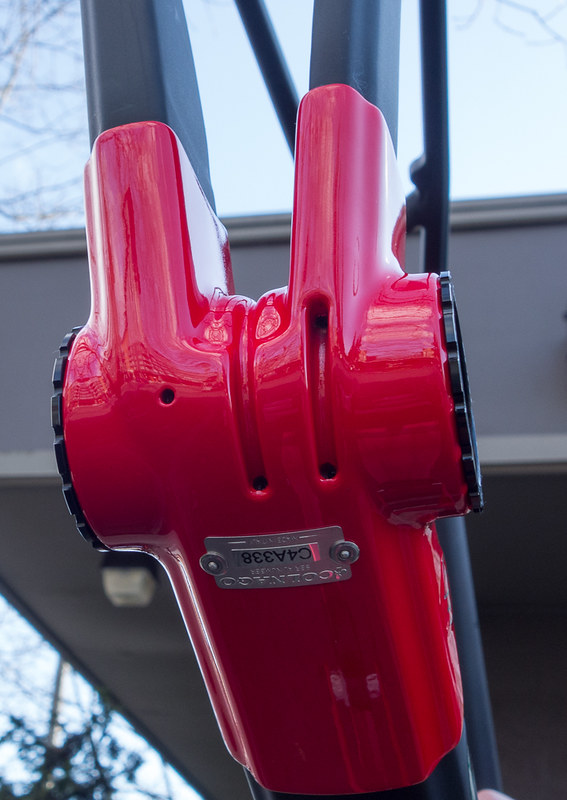
Ok... let's scoot right on over from the downtube waterbottle crevice to another little detail I've always been quite fond of. The steel front brazeon... super solid and riveted on with these special rivets that I've never seen the likes of...
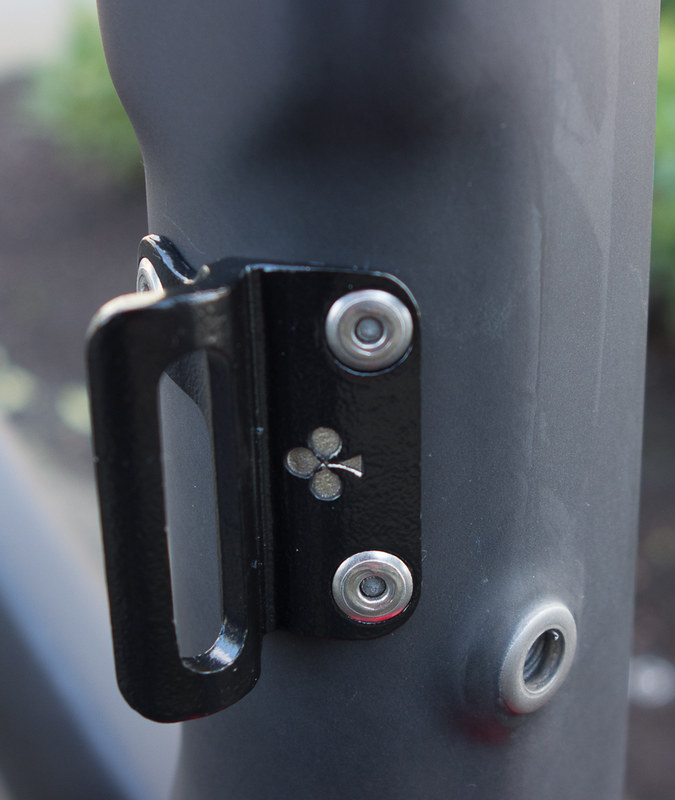
I regress now to a little relevant backstory. A couple, or maybe 3 years ago, a friends Cannondale Evo needed some work and he got the newest Shimano 9000 group to put on. The new front derailleur used a little support screw but when setting up exactly as described by Shimano, the brazeon just cracked. Ouch! I tried some JB Weld to see if that might fix it, but it wouldn't. So, it was surgical repair time and I had to replace the riveted brazeon. I was scared like a frightened puppy. Had I just destroyed my friends bike. The thought made me ill. Sleeping with his wife would have been forgiveable, but to destroy his bike... just shoot me. Anyway... I managed to get a replacement brazeon kit through my local shop, and it was a revised beefed up version and that would better support the Shimano support screw. I practiced the delicate operation on that destroyed C50 I showed earlier, by drilling and removing the rivets and practiced drilling a hole through the tough carbon tube, as the new Cannondale tab had one hole in a slightly different place than the old version. I compared the two tabs, rivets, all of that stuff that anyone would do normally in the course of repair... Lol. Here's what I discovered...
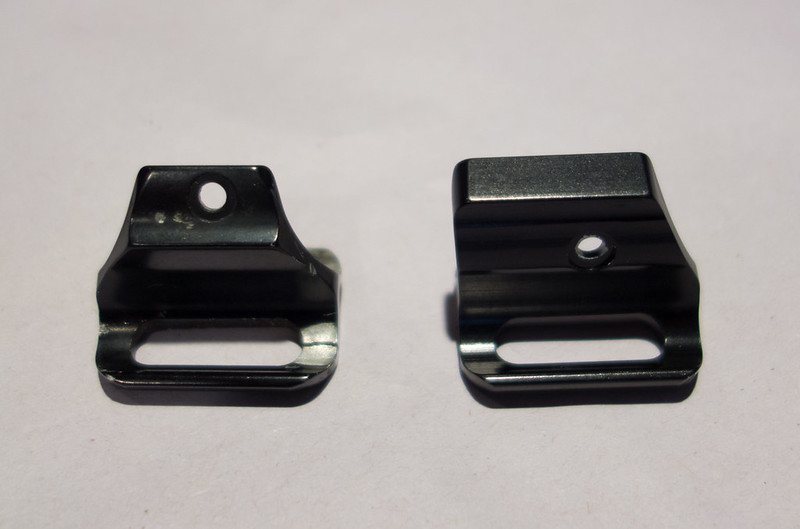
On the left in the pic above you see the broken brazeon and on the right the new version. The old version weighed a scant 6 grams and was made of some aluminum alloy. Light but not so strong. The new version was probably made of the same stuff but was designed with supporting that new Shimano support screw in mind. Maybe it weighed a gram more, I don't know.
Now compare that to the steel brazeon that I took off the C50... a whopping 20 grams and nothing was going to break that thing. They're essentially using the same steel design for their current brazeons, a little more cutout to accommodate the new derailleur designs, but still the same solid indestructible steel versus some ultralight but not so strong something else. I know, probably overkill but I kinda like knowing it's "overbuilt"...
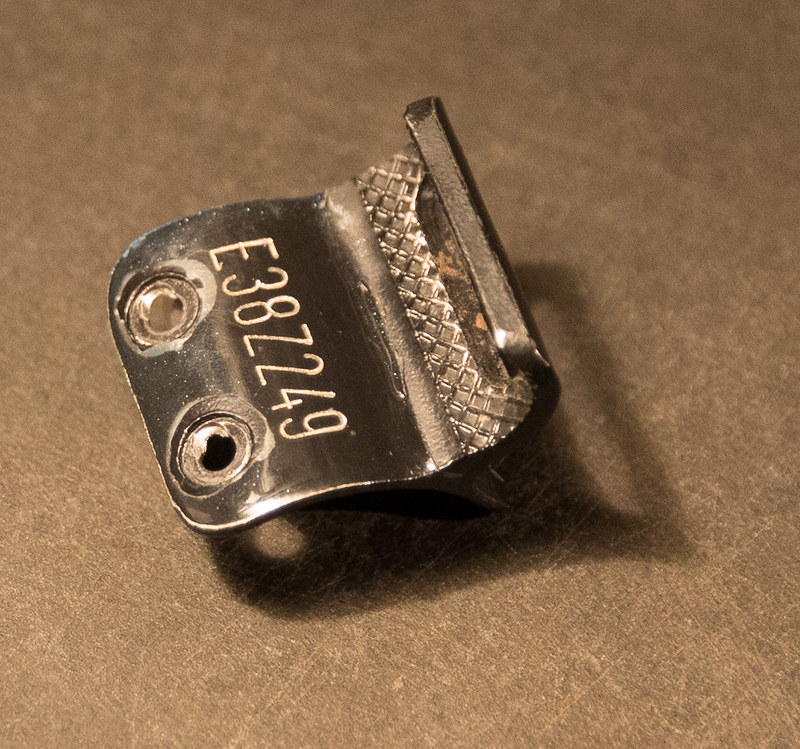
Even the rivets used are unlike any I've seen. They're not simple "pop" rivets which can tend to pull through material. These flatten out on the inside of the tube, providing a super secure fixing and can't really pull through the carbon like a pop rivet might... I guess I bring this up because as I look inside the very clean tubes, they are still using these same rivets, even for the serial number plate underneath the bottom bracket... sometimes it’s the stuff you can’t see that makes you smile knowingly.
Ok, that was probably a really boring post, but I'm trying to leave no stone unturned here.
I regress now to a little relevant backstory. A couple, or maybe 3 years ago, a friends Cannondale Evo needed some work and he got the newest Shimano 9000 group to put on. The new front derailleur used a little support screw but when setting up exactly as described by Shimano, the brazeon just cracked. Ouch! I tried some JB Weld to see if that might fix it, but it wouldn't. So, it was surgical repair time and I had to replace the riveted brazeon. I was scared like a frightened puppy. Had I just destroyed my friends bike. The thought made me ill. Sleeping with his wife would have been forgiveable, but to destroy his bike... just shoot me. Anyway... I managed to get a replacement brazeon kit through my local shop, and it was a revised beefed up version and that would better support the Shimano support screw. I practiced the delicate operation on that destroyed C50 I showed earlier, by drilling and removing the rivets and practiced drilling a hole through the tough carbon tube, as the new Cannondale tab had one hole in a slightly different place than the old version. I compared the two tabs, rivets, all of that stuff that anyone would do normally in the course of repair... Lol. Here's what I discovered...
On the left in the pic above you see the broken brazeon and on the right the new version. The old version weighed a scant 6 grams and was made of some aluminum alloy. Light but not so strong. The new version was probably made of the same stuff but was designed with supporting that new Shimano support screw in mind. Maybe it weighed a gram more, I don't know.
Now compare that to the steel brazeon that I took off the C50... a whopping 20 grams and nothing was going to break that thing. They're essentially using the same steel design for their current brazeons, a little more cutout to accommodate the new derailleur designs, but still the same solid indestructible steel versus some ultralight but not so strong something else. I know, probably overkill but I kinda like knowing it's "overbuilt"...
Even the rivets used are unlike any I've seen. They're not simple "pop" rivets which can tend to pull through material. These flatten out on the inside of the tube, providing a super secure fixing and can't really pull through the carbon like a pop rivet might... I guess I bring this up because as I look inside the very clean tubes, they are still using these same rivets, even for the serial number plate underneath the bottom bracket... sometimes it’s the stuff you can’t see that makes you smile knowingly.
Ok, that was probably a really boring post, but I'm trying to leave no stone unturned here.
Last edited by Calnago on Mon Feb 12, 2018 4:30 am, edited 2 times in total.
Colnago C64 - The Naked Build; Colnago C60 - PR99; Trek Koppenberg - Where Emonda and Domane Meet;
Unlinked Builds (searchable): Colnago C59 - 5 Years Later; Trek Emonda SL Campagnolo SR; Special Colnago EPQ
Unlinked Builds (searchable): Colnago C59 - 5 Years Later; Trek Emonda SL Campagnolo SR; Special Colnago EPQ
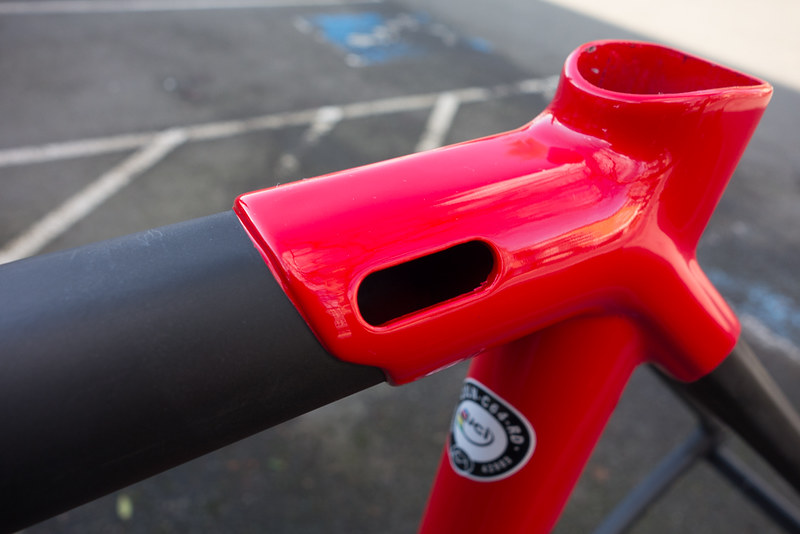
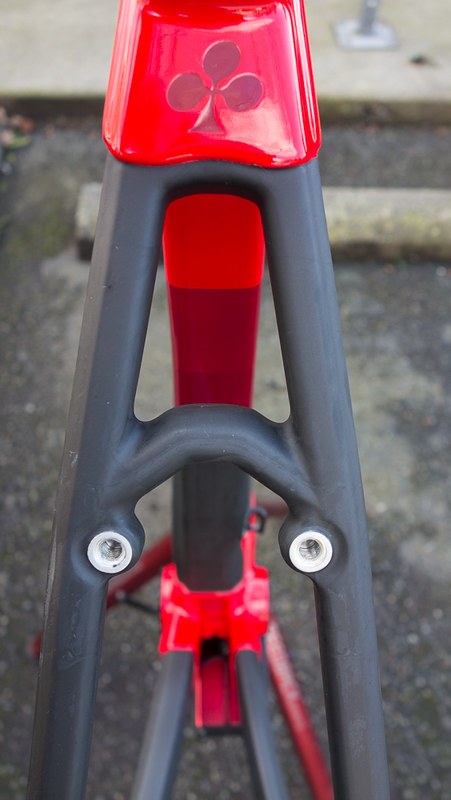
Back to the task at hand... ok... let's now look up... wayyyy up... from where we are at the front derailleur brazeon to the brand new seat cluster area... oooh, ahhh...
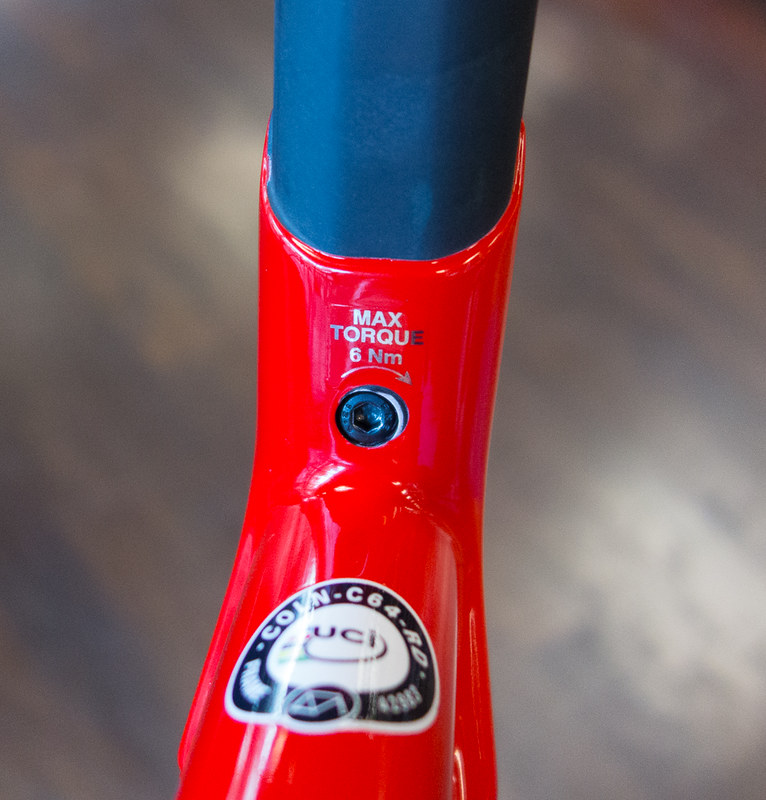
There it is, the underside of the top tube where it meets the seat tube and the bolt which tightens the new seat clamp. They say the clamp saves 15grams, so given that the old seat collar clamp weighed 25 grams, I'm estimating this clamp at 10grams.
Now, from the top looking in, we see the same proprietary shape as the V1-R...a "D" kind of shape...
While we're at it, we might as well check out the new seatpost...
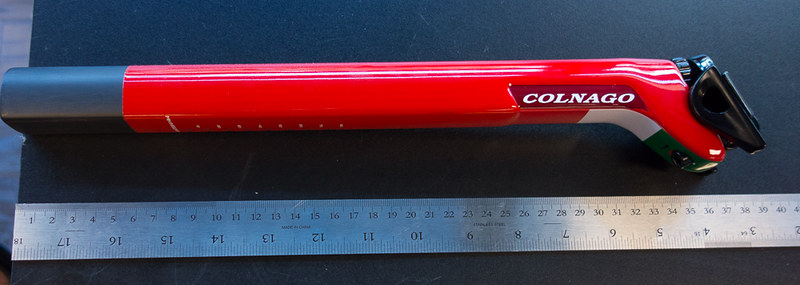
I would bet a good amount that more than 95% of the vertical compliance difference comes from this seatpost/seattube arrangement. When I was looking for new rain bike a few years ago, I tried the Giant Advanced Defy and it had a very similarly designed seatpost. Combined with the fairly sloping top tube, which makes for a shorter seattube, I could not believe the amount of give it had. It was actually too much and it felt like the front and the rear were unbalanced, out of synch with each other, the front being stiff and sure, with the rear feeling like I was in a lounge chair. I rode the Trek Domane too, with it's Isospeed and that surprisingly didn't have as much give. So there's no question that a lot of compliance can be built into this puppy right here. If I get a chance to try one I will report back here and let you know what it feels like.
There it is, the underside of the top tube where it meets the seat tube and the bolt which tightens the new seat clamp. They say the clamp saves 15grams, so given that the old seat collar clamp weighed 25 grams, I'm estimating this clamp at 10grams.
Now, from the top looking in, we see the same proprietary shape as the V1-R...a "D" kind of shape...
While we're at it, we might as well check out the new seatpost...
I would bet a good amount that more than 95% of the vertical compliance difference comes from this seatpost/seattube arrangement. When I was looking for new rain bike a few years ago, I tried the Giant Advanced Defy and it had a very similarly designed seatpost. Combined with the fairly sloping top tube, which makes for a shorter seattube, I could not believe the amount of give it had. It was actually too much and it felt like the front and the rear were unbalanced, out of synch with each other, the front being stiff and sure, with the rear feeling like I was in a lounge chair. I rode the Trek Domane too, with it's Isospeed and that surprisingly didn't have as much give. So there's no question that a lot of compliance can be built into this puppy right here. If I get a chance to try one I will report back here and let you know what it feels like.
Last edited by Calnago on Thu Feb 22, 2018 2:25 am, edited 4 times in total.
Colnago C64 - The Naked Build; Colnago C60 - PR99; Trek Koppenberg - Where Emonda and Domane Meet;
Unlinked Builds (searchable): Colnago C59 - 5 Years Later; Trek Emonda SL Campagnolo SR; Special Colnago EPQ
Unlinked Builds (searchable): Colnago C59 - 5 Years Later; Trek Emonda SL Campagnolo SR; Special Colnago EPQ
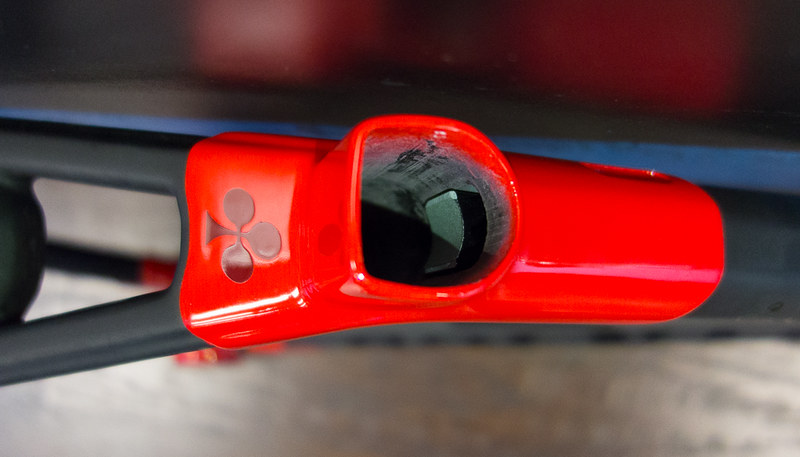
Ok... now that we've been up for some air, lets go back down... way down to see the Bottom Bracket shell...
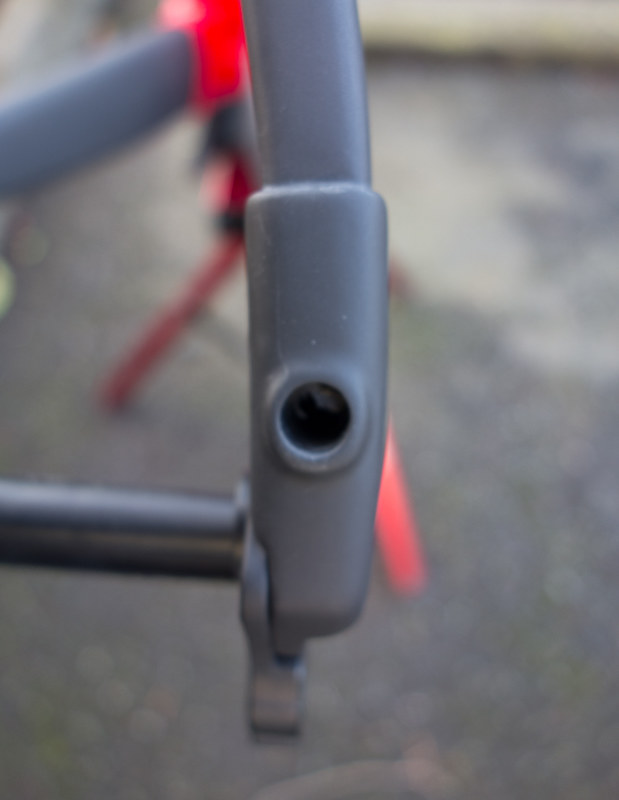
ooops... before we head down, I forgot to show the rear brake housing port in the top tube...nothing much to say... it's a port...
Ok, back to the bottom bracket...
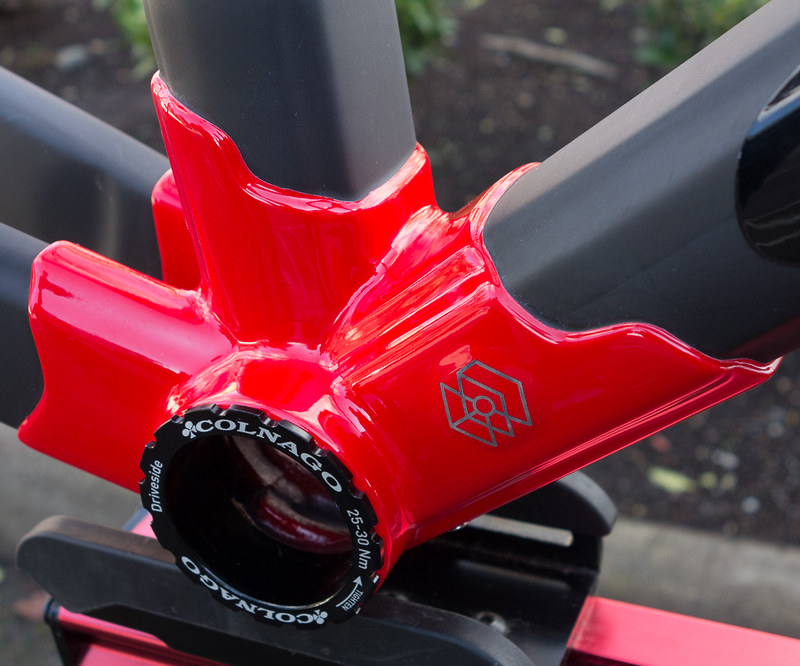
There's a lot already written in the various reviews about it already, some of it quite incorrect it seems. Anyway, it's basically the same Threadfit affair that the C60 has. There will be some BB options from Ceramic Speed, but they are just that, options. If you're familiar with the C60 BB, this is exactly the same.
So let's look closer inside, to see how I'm going to route my mechanical cables. But before that, let's have a peek underneath to see the awesome integrated cable guides. Love these. No more plastic cable guide mount. And I'm hoping to just get to use my thick Teflon tubing to produce a pretty much completely sealed pathway for the cables...
You can see that groove for the front derailleur cable. Nice... Oh, and might as well take note now of the asymmetric chainstays with the left one being much thicker than the right. Can't remember off the top of my head why they did that, actually not sure that I ever knew. Note to find out.
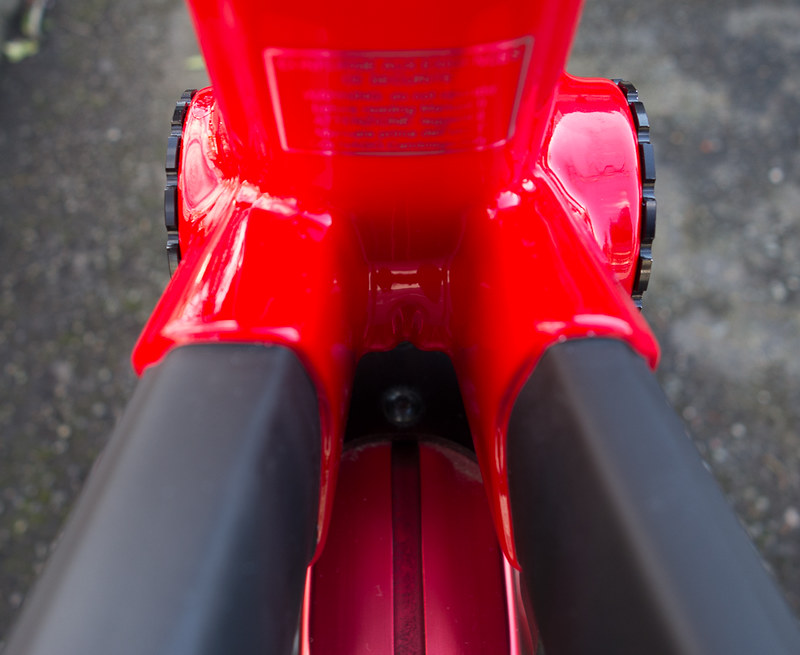
And underneath you can see the molding for the cables...
I took some of my ultrathick PTF something or other sheathing along to see if it would fit through these holes. If you recall, for my C59 and C60 I had to dremel out the channel in the cable guides for this stuff to be able to seat in it's so thick, but it really does provide a nice friction free run for the cables and is worth it...
In this shot below you can see the piece of tubing I ran through the front derailleur hole just to verify that it fit... It did! Yippee!...
ooops... before we head down, I forgot to show the rear brake housing port in the top tube...nothing much to say... it's a port...
Ok, back to the bottom bracket...
There's a lot already written in the various reviews about it already, some of it quite incorrect it seems. Anyway, it's basically the same Threadfit affair that the C60 has. There will be some BB options from Ceramic Speed, but they are just that, options. If you're familiar with the C60 BB, this is exactly the same.
So let's look closer inside, to see how I'm going to route my mechanical cables. But before that, let's have a peek underneath to see the awesome integrated cable guides. Love these. No more plastic cable guide mount. And I'm hoping to just get to use my thick Teflon tubing to produce a pretty much completely sealed pathway for the cables...
You can see that groove for the front derailleur cable. Nice... Oh, and might as well take note now of the asymmetric chainstays with the left one being much thicker than the right. Can't remember off the top of my head why they did that, actually not sure that I ever knew. Note to find out.
And underneath you can see the molding for the cables...
I took some of my ultrathick PTF something or other sheathing along to see if it would fit through these holes. If you recall, for my C59 and C60 I had to dremel out the channel in the cable guides for this stuff to be able to seat in it's so thick, but it really does provide a nice friction free run for the cables and is worth it...
In this shot below you can see the piece of tubing I ran through the front derailleur hole just to verify that it fit... It did! Yippee!...
Colnago C64 - The Naked Build; Colnago C60 - PR99; Trek Koppenberg - Where Emonda and Domane Meet;
Unlinked Builds (searchable): Colnago C59 - 5 Years Later; Trek Emonda SL Campagnolo SR; Special Colnago EPQ
Unlinked Builds (searchable): Colnago C59 - 5 Years Later; Trek Emonda SL Campagnolo SR; Special Colnago EPQ
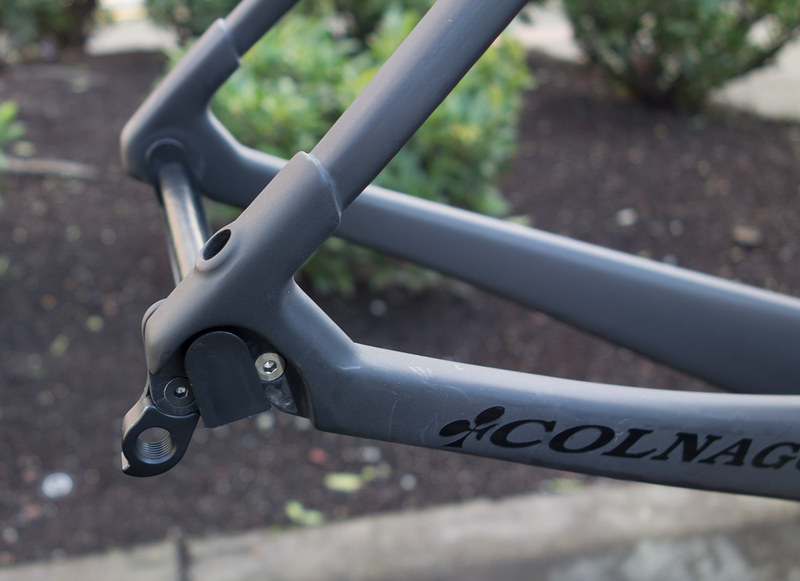
Ok... back up to the rear brake bridge area...
Only thing of note here is that the bridge and stays are nice and solid, and I understand for the disc version the bridge stays, even though on a lot of other disc bikes they are omitting that bridge completely. I think it adds some good support between the seatstays, but I wouldn't be surprised if the main reason for leaving it there is simply because that's the easiest production route to take, since they only have to make one set of seat stays. Then drill out and thread the Direct Mount holes for the brakes in the rim brake version...
And the chainstays and dropouts... bonded on the seatstay side, and a part of the mold on the chainstay side.
Ok... that's basically all I got. I'm talked out, so will give some final thoughts tomorrow perhaps. Questions, comments, inflammatory insults all welcome in the meantime.
Ha... first build thread I've ever done without turning a single screw. Oh, I'll have a list of weights next time I sit down as well. Of course I weighed it... Sheesh! You guys are such weenies.
Ciao!
Last edited by Calnago on Mon Feb 12, 2018 5:11 am, edited 2 times in total.
Colnago C64 - The Naked Build; Colnago C60 - PR99; Trek Koppenberg - Where Emonda and Domane Meet;
Unlinked Builds (searchable): Colnago C59 - 5 Years Later; Trek Emonda SL Campagnolo SR; Special Colnago EPQ
Unlinked Builds (searchable): Colnago C59 - 5 Years Later; Trek Emonda SL Campagnolo SR; Special Colnago EPQ

That water bottle recess really feels like the answer to a question no-one was asking.
-
dereksmalls
- Posts: 2305
- Joined: Tue Aug 02, 2011 9:20 pm
- Location: New Zealand
F@@ken stunning!!


Nice Cal and as always, very immaculate in trying not to overlook any small details.
As an owner of of a C60 myself, there are several things that I like and don't like.. Of course my "Meh's" may be another's "Wow" so I'll try not to flare things up prematurely.
I do like the pressed in "Ace of Club" logo right above the rear bridge. Certainly adds a bit more detail to the frame whereas the C60 simply had what I thought to be an "unnecessary" decal. But you know what, I think that's all I really like, at least so far from what I've seen and read thus far.
Lets go to some of the meh's. As you pointed out, the cable entry ports in the downtube kind of remind me of how my Cento10 came. At least Wilier were smart enough to make several iterations of the port that stemmed from mechanical, all the way through Di2 and then just a plate for Etap users. In this case, the port doesn't look "removable" so Etap users will likely have to grab a stick of "Sugru" a really old copy of the movie Ghost and put their molding skills to good use as any rain (or anything else) may easily find its way dripping into the port holes. I'm pretty neutral on the proprietary seatpost. It looks pretty cool and goes with the recent trends over the "faux" ISP look. However the true enthusiasts will likely fret on something that can't be replaced for anything "lighter" like say, a Deda or even an AX seatpost. Finally, my final niggle is the rear dropout. I never really liked how it was recessed granted there were several times when my quick releases would dig into them when I tried to close them. Let alone, if you used any released that had flat levers, you could never get a clean closure without having them point towards the 4 o'clock direction right below the chainstays.
If the frame is meant to be "lightened", then it should come close to the ride qualities of an old C60 that was right on the dot of making the 6kg mark, ala Imaking's old c60 as well as my ST01? At 5.98kg, my C60 is sprightly as heck but that's not without severe damage to the wallet. If the C64 can get there with a stock build and some carbon tubulars, then we have a seriously good frame and would convince the current C60 owners to jump for the "next best thing".
I await the final verdict with abated breath!
THE PAST: 2005 C'dale R700, 2006 Spesh S-Works Tarmac Gerolsteiner, 2009 Pinarello Dogma FPX My Way, 2011 Time RXR VIP
THE PRESENT: 2016 Colnago C60 ST01, 2017 Wilier Cento 10 Ramato, Cinelli Gazetta
THE FUTURE:
THE PRESENT: 2016 Colnago C60 ST01, 2017 Wilier Cento 10 Ramato, Cinelli Gazetta
THE FUTURE:
Visit starbike.com Online Retailer for HighEnd cycling components
Great Prices ✓ Broad Selection ✓ Worldwide Delivery ✓
www.starbike.com


