'15 Cervelo S5 DIY Build- SRAM 1x, TriRig Omega, Flo 60's- LOTS of photos

Who are you (no off-topic talk please)

Moderators: MrCurrieinahurry, maxim809, Moderator Team

DamenH85
Posts: 33
Joined: Mon Dec 22, 2014 3:23 pm
Location: Houston, TX

by DamenH85

Hi Everyone-

My old Allez headset bearings broke and chewed up the fork, so I took the opportunity to upgrade to a whole new bike. I live and ride in Houston. It's very flat. I'm a pretty strong aeroweenie, which is reflected in my build.

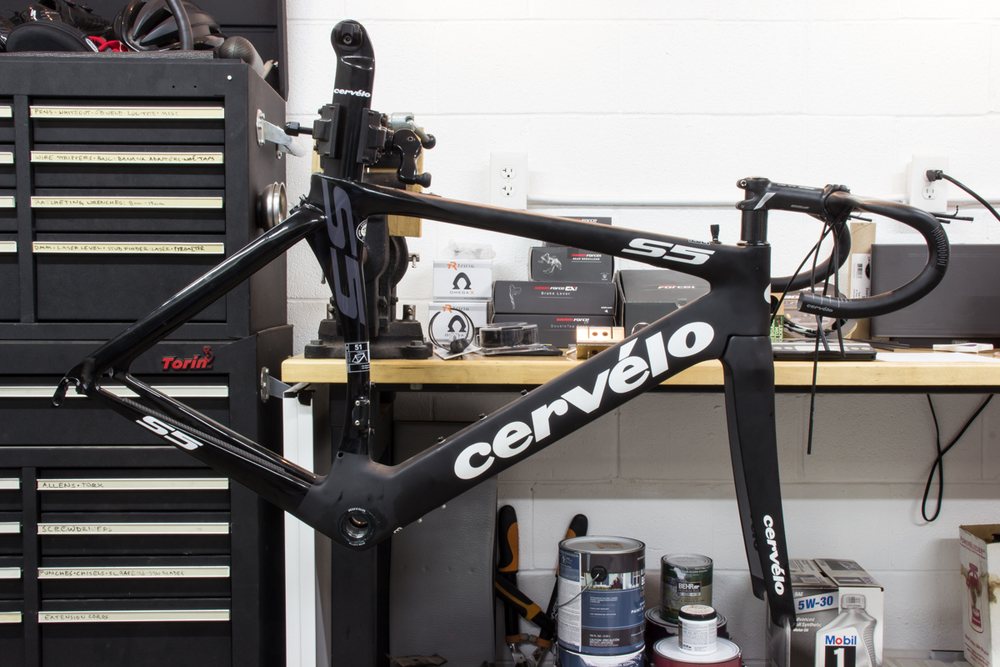
I'm not a mechanic or anything, but I enjoy working on bikes anyhow, so I did this build by myself in my garage. As the title states, I wanted to try SRAM's Force 1 groupset along with TriRig's Omega X aero brakes and Flo Cycling's new 60mm Carbon Clinchers on an S5 frame. I didn't give much consideration to weight, but here's the list of components and weights:

Component......Weight (grams)....Notes
Frame.............982.................2015 Cervelo S5 size 51
Rear Wheel.......838..................Flo 60 Carbon Clincher w/ 11-spd hub
Front Wheel......695..................Flo 60 Carbon Clincher
Crankset..........644..................SRAM Force1, 52T chainring, 165mm cranks
Pedals.............438..................PowerTap P1 w/ AAA batteries
Fork...............367..................Cervelo S5, uncut, with insert and star nut
Chain..............277..................SRAM PC-1170
Handlebar.........264.................Cervelo 40cm aerobars
Rear Derailleur...259................SRAM Force 1 Medium Cage
Rear Cassette....257.................SRAM PG-1170, 11-spd, 11-28T
Seat...............245.................Fizik Arione Versus K:ium
Tires...............211.................Continental GP4000SII 23mm (211g for 1 tire; used front and rear)
Seatpost...........196.................Cervel S5 cut to 317mm with seat clamp and wedge
Right Brifter......159.................SRAM Force 22 DoubleTap Control
Rear brake........150.................TriRig Omega X, Flo pads, Cervelo bracket, spacers for fitment
Bottom Bracket...149................ Wheels Mfg. BBright-Out-for-SRAM, threaded alloy cups, angular bearings
Bar finishing......136.................Lizardskin DSP 3.2, Fizik gel, Fyxation bar ends. Weight includes both sides.
Stem...............127..................FSA OS-99 Csi 100mm -6 deg, with bolts and faceplate
Front Brake .......121..................TriRig Omega X, Flo brake pads
Left Brake Lever..117..................SRAM CX1, brake only
Tubes...............71...................Vittoria Latex 51mm stem (71g for 1 tube; used front and rear
Wheel Skewer......53...................Flo Cycling
Bottle Cage........28..................Arundel Dave-O
Misc................556................Cabling, Garmin mount, bolts, whatever else I forgot
TOTAL..............7,340...............

I had a pretty ugly battle with the bottom bracket, switching from Rotor's 30mm spindle to a Wheels Mfg. BBright/SRAM GXP. It took some awful hammering to get the original one out, then I had to install/uninstall/re-install-with-spacer the Wheels Mfg. BB to get the fitment/wave washer situation just right. I ended up making my own press-out tool to uninstall the Wheels Mfg. BB because I refused to hammer any more on my nice, new, unridden stuff. You'll see those photos halfway through.

The other piece that wasn't super straight forward was the rear brake. I didn't like how it fit right out of the box, so I sawed a bit of (hopefully) extraneous material off to clean it up.

So far, it's been a real treat to ride. The last thing to do is trim the steerer after I'm sure about my position.

I haven't added any commentary on the photos because I think they rather explain themselves, but I like talking about bikes, so any questions/comments are welcome! I hope you enjoy-

damen
Image
Image
Image
Image
Image
Image
Image
Image
Image
Image
Image
Image
Image
Image
Image
Image
Image
Image
Image
Image
Image
Image
Image
Image
Image
Image
Image
Image
Image
Image
Image
Image
Image
Image
Image
Image
Image
Image
Image
Image
Image
Image
Image
Image
Image
Image
Image
Image
Image
Image
Image
Image
Image
Image
Image
Image
Image
Image
Image
Image
Image
Image
Image
Image
Image
Image
Image
Image
Image
Image
Image
Image
Image
Image
Image
Image
Image

I have all these and more photos with commentary on my site: http://29parallel.co

Cheers!

BigPoser
Posts: 172
Joined: Tue Oct 21, 2014 11:42 pm

by BigPoser

Very cool. What happened with the bottom bracket?

Also, to my knowledge you really shouldn't be using that star nut in the steerer tube if it's carbon. It can do some damage to the carbon tube itself.

by Weenie


Visit starbike.com Online Retailer for HighEnd cycling components
Great Prices ✓    Broad Selection ✓    Worldwide Delivery ✓

www.starbike.com


glam2deaf
Posts: 712
Joined: Mon Apr 27, 2015 4:36 am

by glam2deaf

Damn, that's nice. Awesome work on that rear brake too.

cobrakai
Posts: 76
Joined: Wed Jun 24, 2015 11:19 pm

by cobrakai

Sweet build! How do you like the Flos? I'm strongly considering picking up a set.

dereksmalls
Posts: 2305
Joined: Tue Aug 02, 2011 9:20 pm
Location: New Zealand

by dereksmalls

Great pics! But can this be moved to the Introduce Yourself forum?

kulivontot
Posts: 1163
Joined: Sun May 16, 2010 7:28 pm

by kulivontot

This many photos, and yet you forget the finished bike scale shot, and fail to hit 6.8kg with a 1x setup. gtfo

GothicCastle
Posts: 304
Joined: Mon Jul 04, 2016 1:52 am

by GothicCastle

Is that a star nut in the steerer? If so, not generally a good idea with a carbon steerer.

Also, 165 cranks?

glam2deaf
Posts: 712
Joined: Mon Apr 27, 2015 4:36 am

by glam2deaf

GothicCastle wrote:Is that a star nut in the steerer? If so, not generally a good idea with a carbon steerer.

Also, 165 cranks?


It's a star nut in an alloy insert that is then epoxy'd into the steerer. It's standard on all Cervelo's. I used to run one in my S3, but it came loose over time. Now I just use a FSA expander cap.

CulBaire
Posts: 384
Joined: Mon Apr 19, 2004 11:33 am
Location: T'ba!
Contact:

by CulBaire

Great thread... I love this build! :beerchug:

sanandreas
Posts: 99
Joined: Fri May 20, 2016 9:54 am

by sanandreas

Nice pics !
Very good build !

locktopus
Posts: 165
Joined: Mon Oct 03, 2011 3:47 pm

by locktopus

BigPoser wrote:Very cool. What happened with the bottom bracket?


DamenH85 wrote:I had a pretty ugly battle with the bottom bracket, switching from Rotor's 30mm spindle to a Wheels Mfg. BBright/SRAM GXP. It took some awful hammering to get the original one out, then I had to install/uninstall/re-install-with-spacer the Wheels Mfg. BB to get the fitment/wave washer situation just right. I ended up making my own press-out tool to uninstall the Wheels Mfg. BB because I refused to hammer any more on my nice, new, unridden stuff. You'll see those photos halfway through.

User avatar
gfeldy
Posts: 268
Joined: Fri Aug 08, 2014 6:00 pm

by gfeldy

Have you taken the green sticker off the RD yet?
~GFeldy~
S Works Tarmac w/ EPS
S Works Epic HT Blurple tuned
Kitsbow
S Works Epic Blurple tuned - Sold :doh:
FS-i - Sold
Scalpel custom - Sold
EVO - Sold

whilgenberg
Posts: 57
Joined: Wed Aug 08, 2012 5:54 pm

by whilgenberg

Yes, the bike is nice and it's a great build but that shop setup is absolutely awesome!

DamenH85
Posts: 33
Joined: Mon Dec 22, 2014 3:23 pm
Location: Houston, TX

by DamenH85

Thanks, everyone.

BigPoser wrote:Very cool. What happened with the bottom bracket?

Also, to my knowledge you really shouldn't be using that star nut in the steerer tube if it's carbon. It can do some damage to the carbon tube itself.

The bottom bracket swap was the part of the build I was worried about. I'd never done anything with pressfit, but knew it had a pretty bad reputation. I tried hammering the Rotor cups/bearings on the stand, but there was so much flexing, that was never going to work. So I put it on the ground and supported the frame around the BB and hammered a bit harder. Nothing. I called my LBS and asked if they'd Loctite'd it in. No. They told me it was installed by Cervelo, and it takes them 2 people to get those out. They told me they'd never seen a frame damaged except when someone missed the tool and hammered straight on the frame :(

So I hammered even harder until it came out. I had to hit it really uncomfortably hard; yuck, but no damage. The installation of the new one took me a really long time because the Wheels Mfg. BB wanted to go in crooked. A better tool than what I had would surely keep it straight and would have made the process a lot easier. I ended up having to constantly move the press surface around the circumference of the BB shell, pressing in <1mm at a time, move, press, move, etc. Once I discovered this method to be working nicely, it was reasonably smooth and quick from there. It just took me a long time to figure it out.

Then after I installed the crank, I saw that the wave washer was hardly compressed at all. I was so sad, because that meant uninstalling the whole mess. I didn't want to hammer on the bike any more, so I thought I'd try making my own press that could gently remove it. It was a little bit of effort, but it worked out so much better than hammering. I added the 2.5mm spacer to the drive side, then re-installed. It doesn't seem so bad in hindsight, but when I was in the middle of it, it felt pretty grim.

cobrakai wrote:Sweet build! How do you like the Flos? I'm strongly considering picking up a set.

So far I love the Flo's, however, I haven't ridden any other carbon clinchers, so my opinion probably isn't worth much.

GothicCastle wrote:Is that a star nut in the steerer? If so, not generally a good idea with a carbon steerer.

Also, 165 cranks?

Ya, there's a star-fangled nut in the steerer. As someone else mentioned, Cervelo provides a 75mm aluminum sleeve that is epoxied into the steer tube, so the nut grabs onto the metal. Not 100% sure why it's done like vs. a standard expander; anyone else know? When I cut the extra off, I'll be cutting below the nut, so I will probably switch to an expander.

Yes, 165mm cranks with 52 tooth ring. Crazy hard to find. None of the LBS could get one. Regional distributors didn't have any. I lucked out finding one on Amazon Marketplace from a guy that had only 1. I think maybe I could have got a different crank and then added the 52t ring? I didn't do enough research on chain lines and ring offsets to definitely know the answer to that.

damen

User avatar
prendrefeu
Posts: 8580
Joined: Wed Oct 31, 2007 10:32 pm
Location: Glendale / Los Angeles, California
Contact:

by prendrefeu

Well documented! Nice work on making the small adjustments (and weight loss!) when things don't quite fit together.
Exp001 || Other projects in the works.

by Weenie


Visit starbike.com Online Retailer for HighEnd cycling components
Great Prices ✓    Broad Selection ✓    Worldwide Delivery ✓

www.starbike.com


Post Reply